How to create and publish posts?
Installation
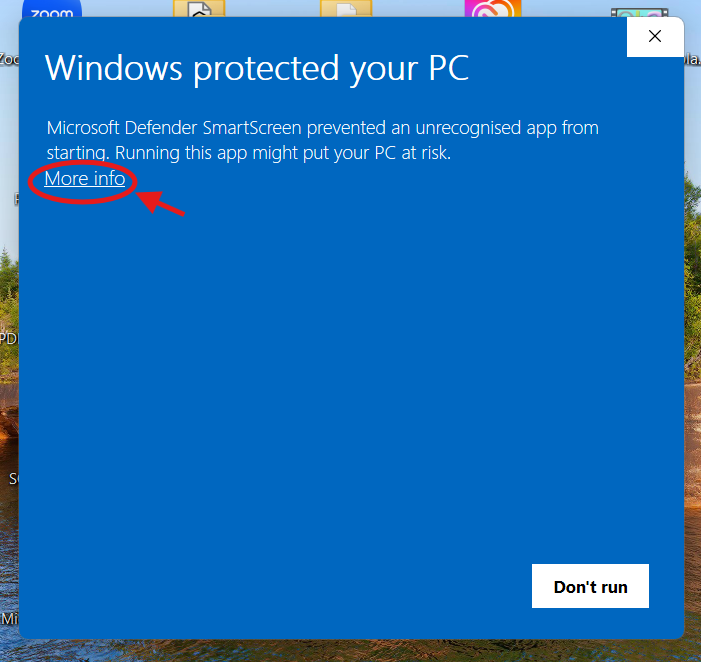
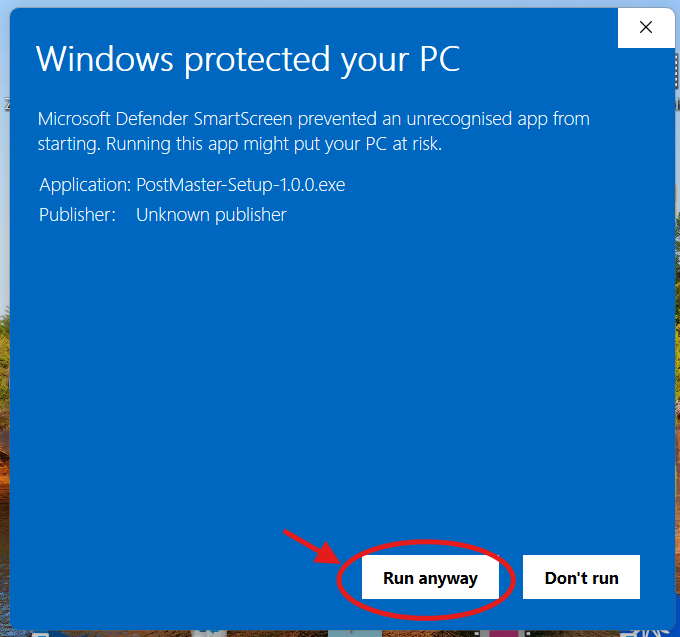
After launching the installation file, Windows Defender may display a warning before running the application. This message appears because the application's certificate is not recognized.
Click the “More info” button, then select “Run anyway,” and continue with the installation process.
Getting an API Key
API Key
API key is a special, unique code (a set of letters and numbers) that works like a ticket or pass for accessing certain services on the internet.
In the case of artificial intelligence (AI), such a key allows your application, website, or other tool to connect to AI models (e.g., GPT, Claude, or Gemini) and use their capabilities — for example, to write text, answer questions, translate, or analyze data.
It may be compared to:
- Karty bibliotecznej – bez niej nie wypożyczysz książek.
- Hasła do Wi‑Fi – dzięki niemu możesz połączyć się z internetem.
- A movie ticket – without it, you can’t enter the screening.
An API key is not your account password, but it should be stored in a safe place. If someone else gets hold of it, they can use your “ticket” and generate costs on your account.
OpenAI (GPT)
Step 1️⃣: Create an account with OpenAI
- Go to the website:
👉 https://platform.openai.com/signup - Sign up:
- Enter your email and password
or - Sign in with Google, Microsoft, or Apple (if you have an account there)
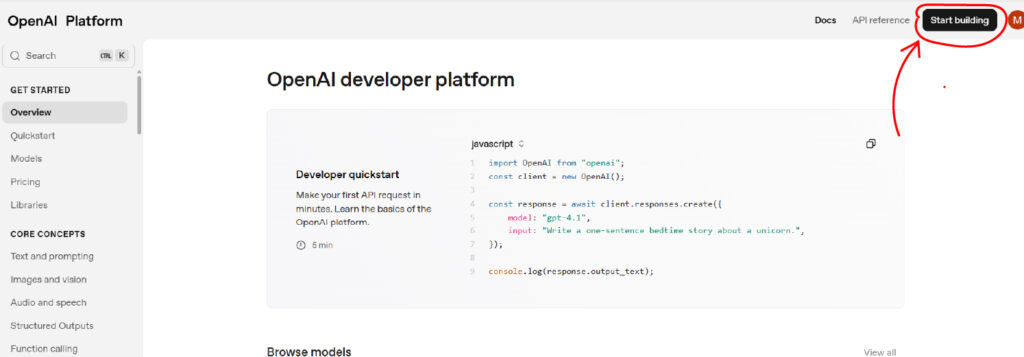
Step 2️⃣: Start account setup
- Click the Start Building button in the top right corner of the screen
- The account setup wizard screen will open.
Step 3️⃣: Organization name
.
- Enter the organization name, e.g., your company name or your own name if you don't have any organization.
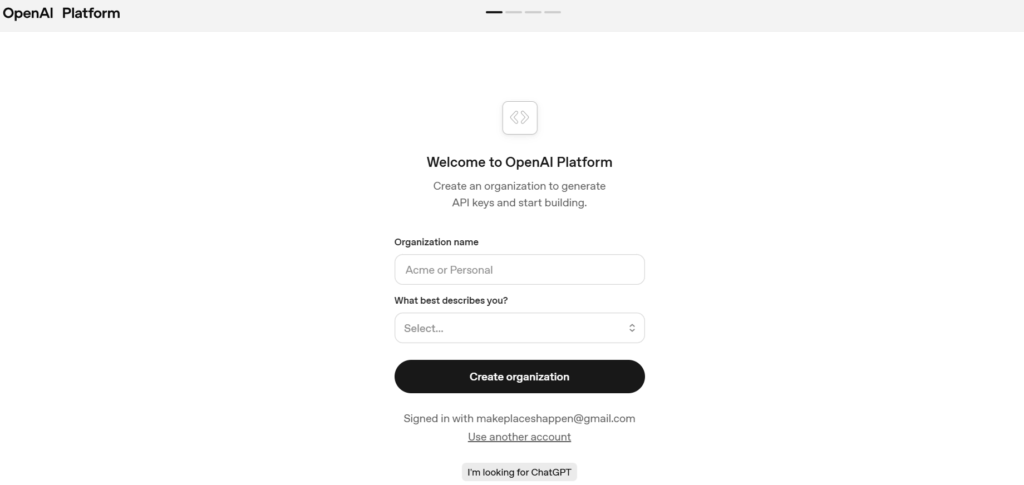
- On the next screen, you can invite organization members to join. You can skip this step by clicking I'll invite my team later

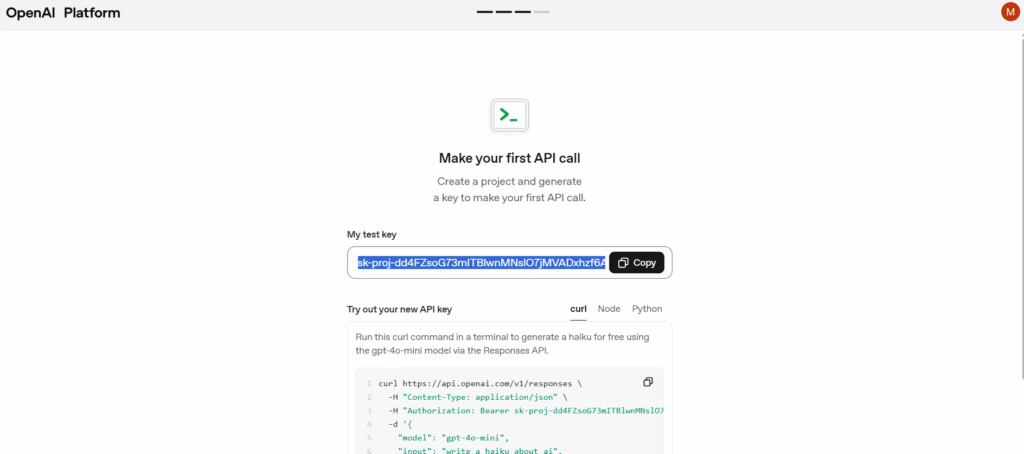
Step 4️⃣: Create API key
- Enter your name for the API key or leave the default one
2. Click Generate API key

3. Pojawi się twój klucz – wygląda np. tak:sk-XXXXXXXXXXXXXXXXXXXXXXXXXXXX ✅ Skopiuj i zapisz ten klucz w bezpiecznym miejscu.
Po zamknięciu okna nie będzie można go ponownie wyświetlić.
4. You can paste this key directly into the PostMaster application. Open Settings->AI and paste the key into the OpenAI API Key field and click Save.
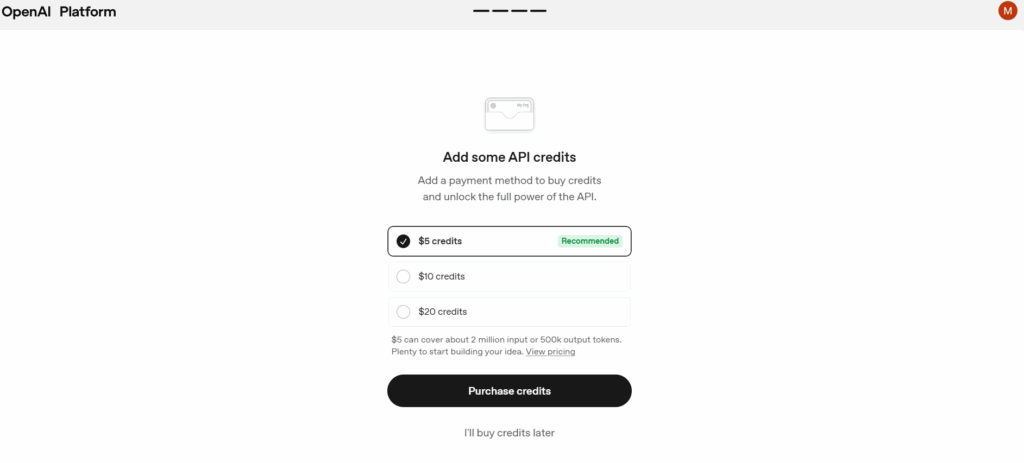
Step 5️⃣: Add billing information and top up your account
- Wybierz kwotę doładowania. Możesz wybrać np. $5 credits (pole oznaczone jako Recommended).
- Za 5 dolarów możesz wygenerować około 2 miliony słów wejściowych lub 500 tysięcy słów wyjściowych.
- Przykład: jeśli jeden post to około 400 słów (wyjściowych), za 5 dolarów możesz wygenerować około 1250 postów.
- Click the Purchase credits button.
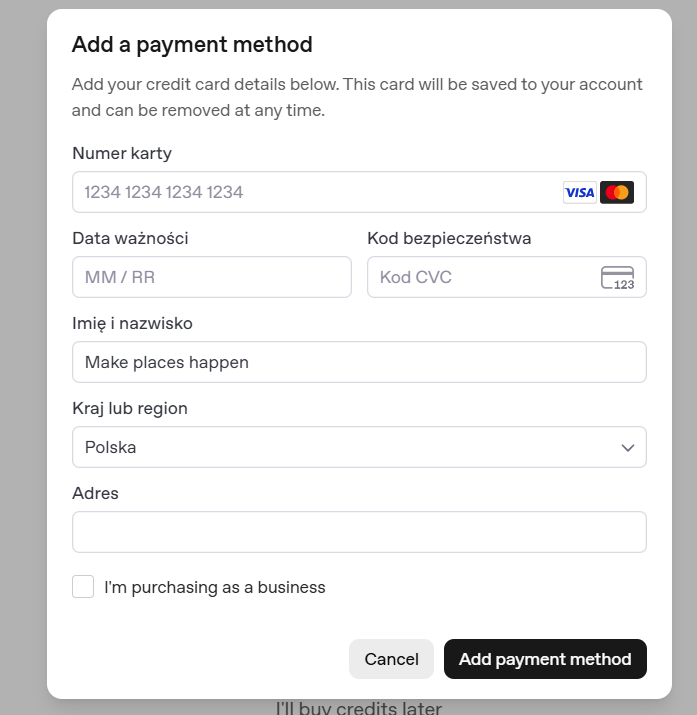
- A window will open **Add a payment method**.
- Enter your payment card details:
Card number – enter the full card number (e.g., 1234 5678 1234 5678).
Expiration date – month and year of card validity (MM/YY).
Security code (CVC) – three-digit code on the back of the card.
First and last name – enter as it appears on the card.
Country or region – select from the list (e.g., Poland).
Adres – wpisz swój adres zamieszkania.
If you are purchasing as a business, check the box "I'm purchasing as a business".
- Click Add payment method to save the data and proceed.
- Done! Your account has been topped up. Billing information has been saved.
Anthropic (Claude)
Step 1️⃣: Create an account on Anthropic service
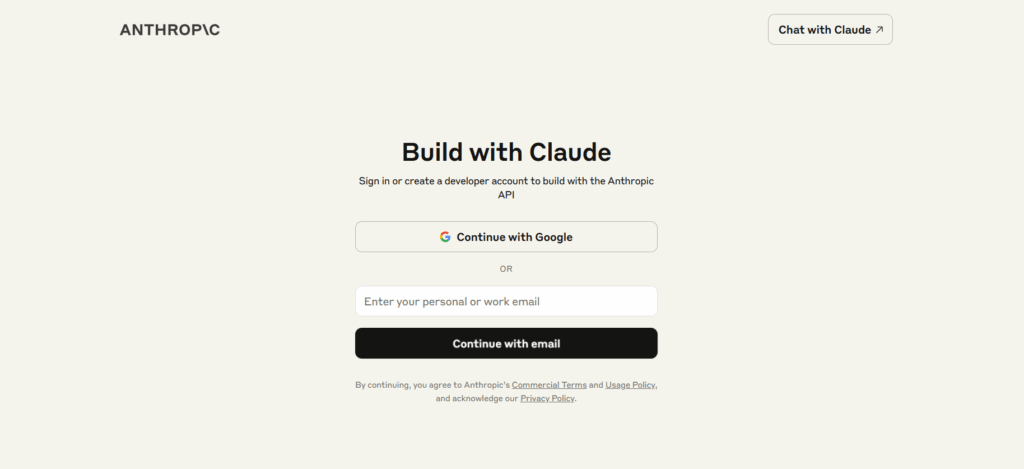
- Go to the website:
👉https://console.anthropic.com
- Create an account on Anthropic service
Enter your email and click Continue with email (or "Continue with Google" if you want to log in using a Google account).
If you log in traditionally – provide your email address, password and confirm registration by clicking the link from the email message.
In case of logging in through Google – select the appropriate account.
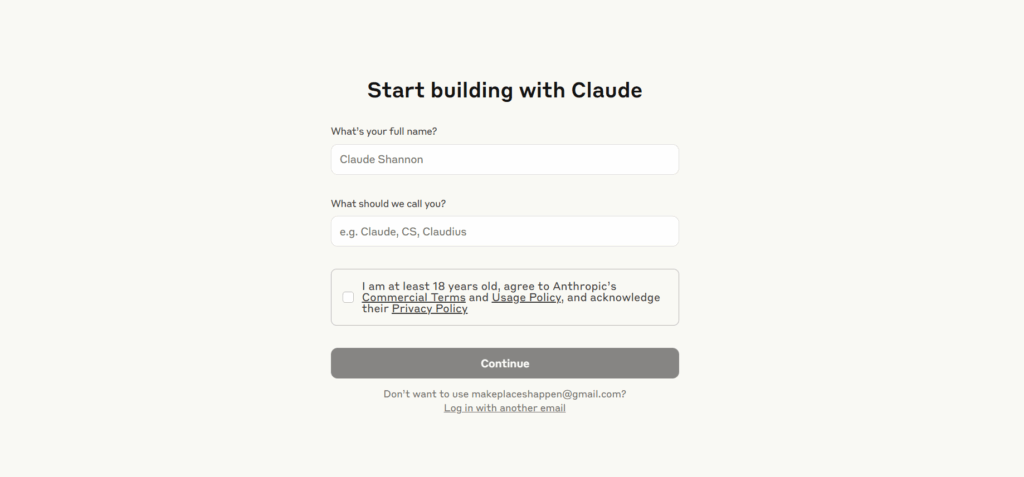
Step 2️⃣: Provide your details and select account type
- Complete your personal information:
In the "What's your full name?" field, enter your first and last name
In the "What should we call you?" field, enter your preferred name (e.g., Claude, CS, Claudius)
Check the checkbox confirming acceptance of the terms of use - Click Continue
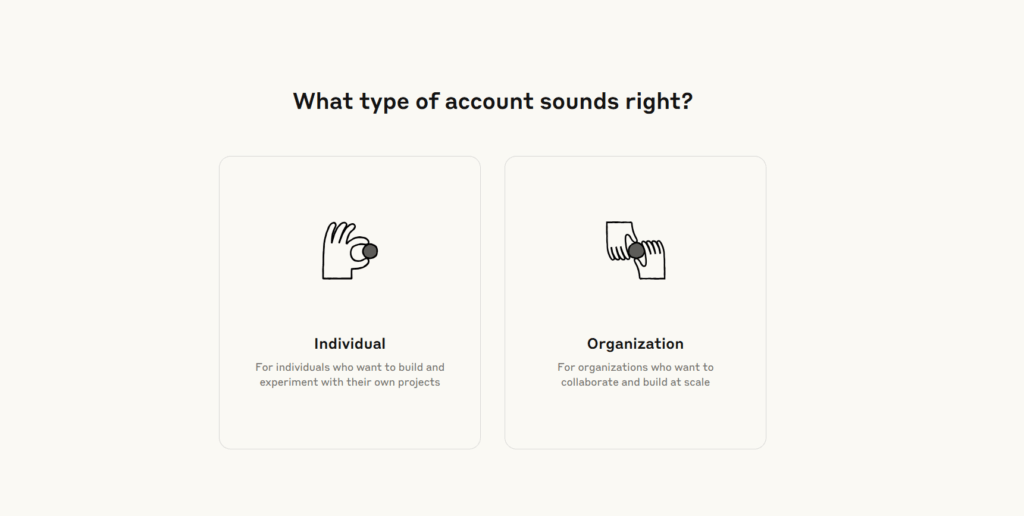
- On the "What type of account sounds right?" screen, select one of the options:
Individual – for private individuals who want to build and experiment with their own projects
Organization – for organizations that want to collaborate and build on a larger scale - After choosing the account type, you will be redirected to the next setup step.
✅ After this step, you will be in the main Anthropic Console dashboard.
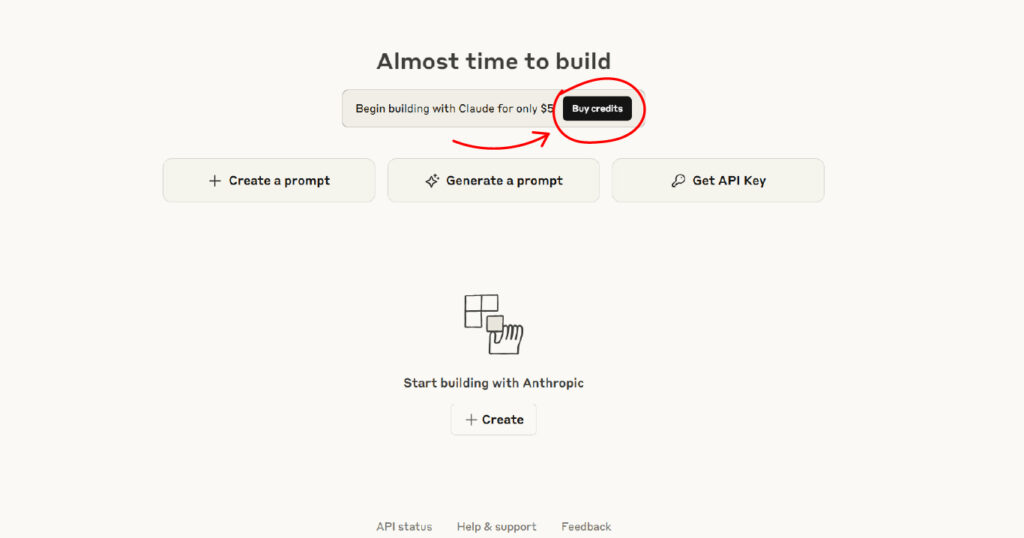
Step 3️⃣: Top up your account
- In the main Console dashboard, you will see the option “Begin building with Claude for only \$5”
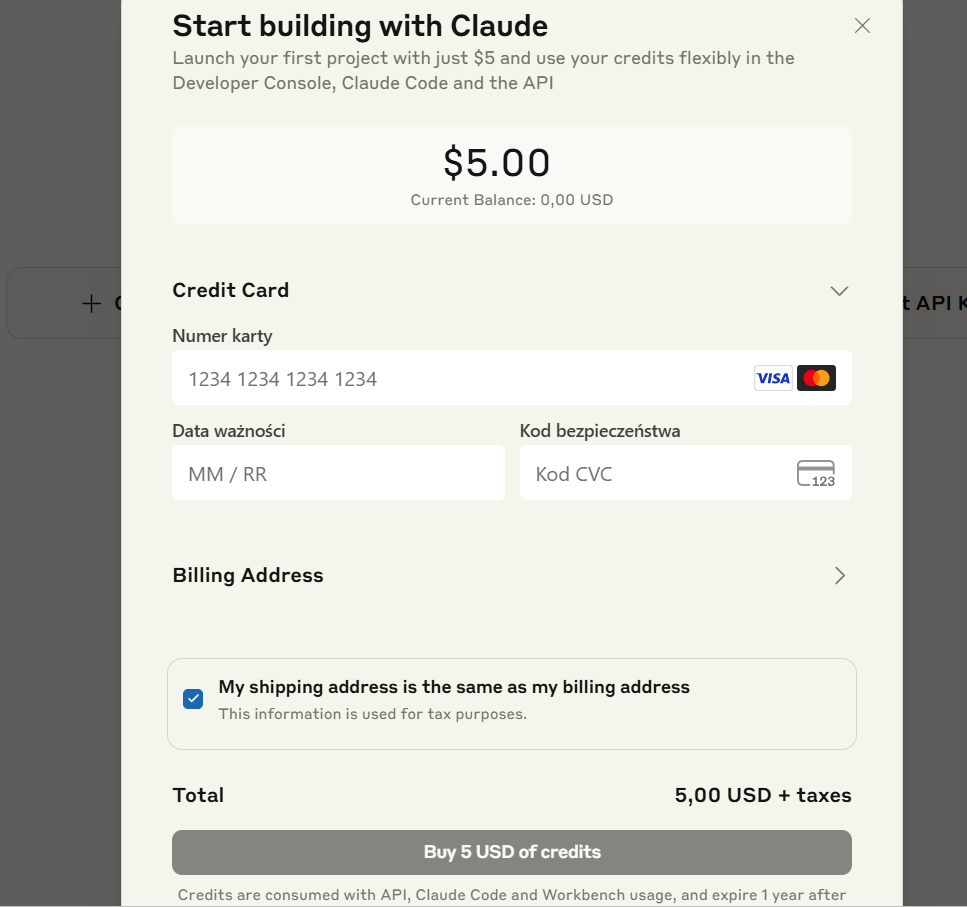
The “Start building with Claude” payment form window will open:
Amount: Default set to \$5.00
Credit card details:
- Enter your card number (Visa, Mastercard accepted)
- Provide the expiration date (MM/YY)
- Enter the CVC security code
Billing address: - Click “Billing Address” to expand the section
- Fill in the required address details
Additional options: - Check the box “My shipping address is the same as my billing address” if the addresses are identical
- Otworzy się okno „Start building with Claude” z formularzem płatności:
Kwota: Domyślnie ustawiona na $5.00
Dane karty kredytowej:- Wprowadź numer karty (akceptowane Visa, Mastercard)
- Podaj datę ważności (MM/RR)
- Wpisz kod bezpieczeństwa CVC
Adres rozliczeniowy: - Kliknij „Billing Address” aby rozwinąć sekcję
- Wypełnij wymagane dane adresowe
Opcje dodatkowe: - Zaznacz checkbox „My shipping address is the same as my billing address” jeśli adresy są identyczne
- Krok 3: Finalizacja
Total: 5,00 USD + taxes
Kliknij „Buy 5 USD of credits”- Za 5 dolarów możesz wygenerować około 2 miliony słów wejściowych lub 500 tysięcy słów wyjściowych.
- Przykład: jeśli jeden post to około 400 słów (wyjściowych), za 5 dolarów możesz wygenerować około 1250 postów.
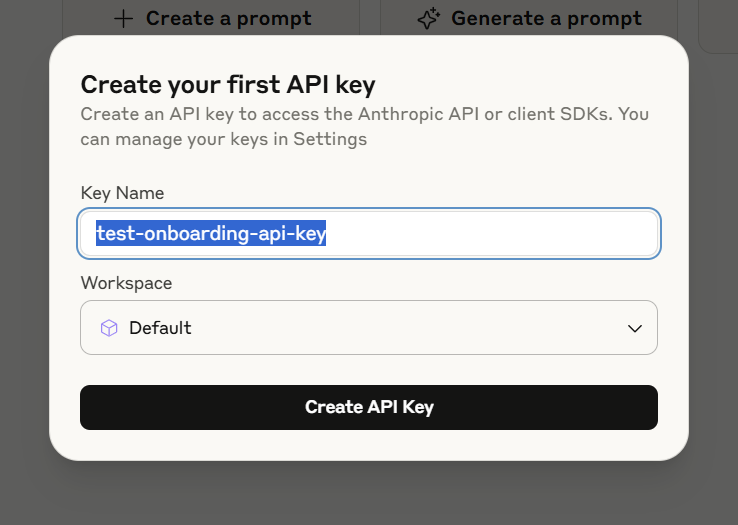
Step 4️⃣: Create API key
- In the main Console dashboard, click the “Get API Key” button.

- The “Create your first API key” window will open:
- Key Name – enter a name for your API key. The name will help you identify the key in the future. Example: postmaster-api-key
- Workspace (Workspace) – Select workspace from the dropdown list. By default, "Default" will be selected
- 2. Click Generate API key
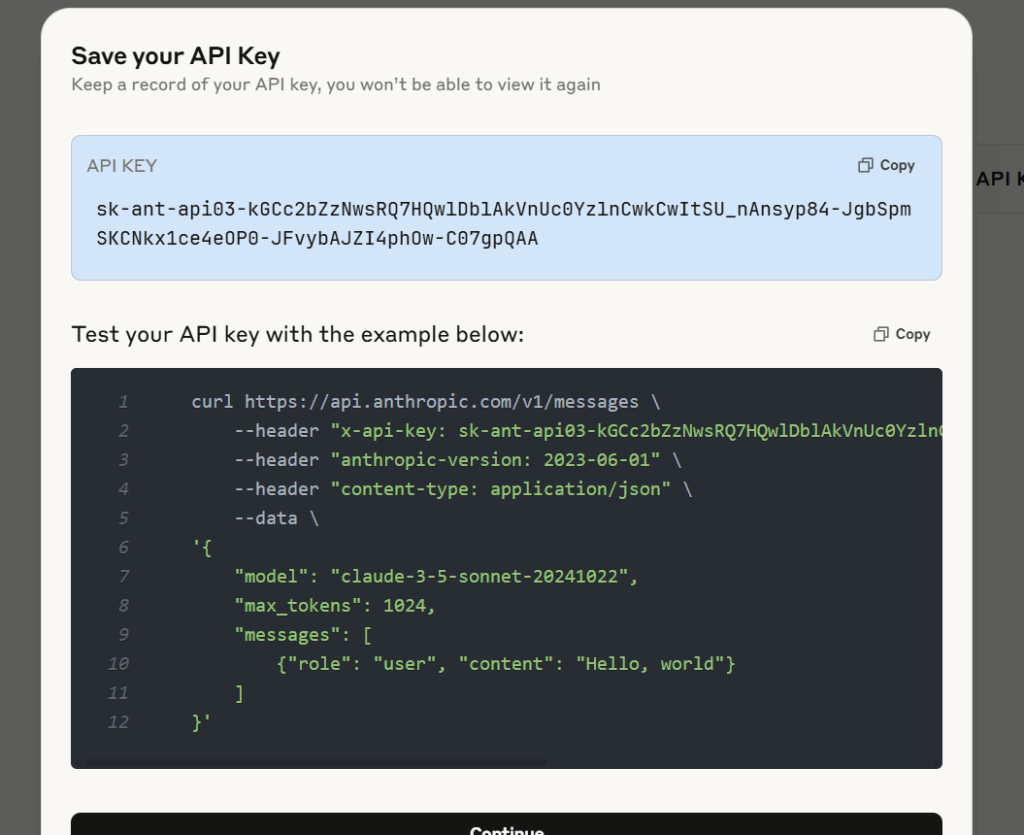
- The API key will be displayed in the blue field
- Format: sk-ant-api03-... (long string of characters)
- Click "Copy" to copy the key to clipboard
- ⚠️ WAŻNE: Zapisz klucz w bezpiecznym miejscu. Nie będziesz mógł ponownie go zobaczyć po zamknięciu tego okna.
- 4. You can paste this key directly into the PostMaster application. Open Settings->AI and paste the key into the OpenAI API Key field and click Save.
Google (Gemini)
Step 1️⃣: Getting started with Google AI Studio
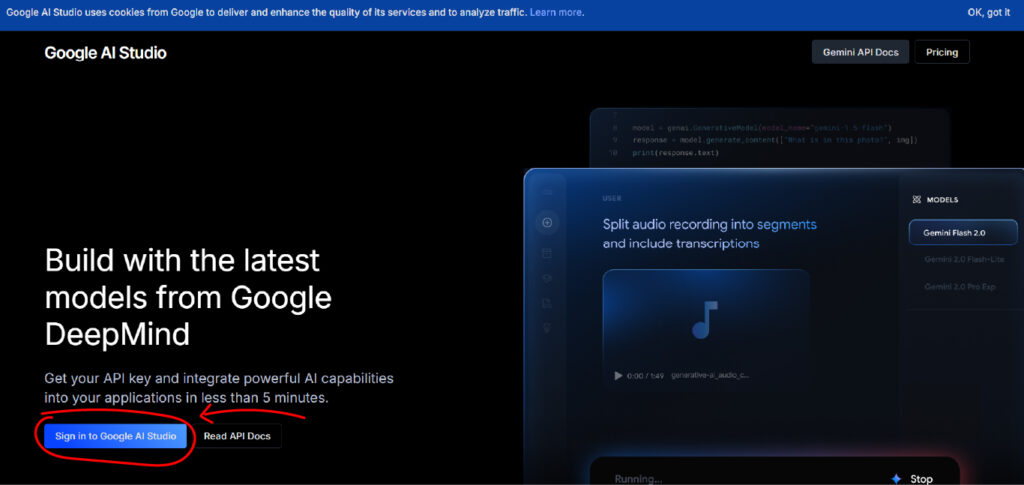
- Przejdź na stronę Google AI Studio
👉 https://aistudio.google.com/ - On the main page you will see the slogan: "Build with the latest models from Google DeepMind"
- Click the button „Sign in to Google AI Studio”
- Log in with your Google account (if you don't have a Google account, create one first)
Step 2️⃣: Create an API key
- After logging in, you will see the main Google AI Studio dashboard.
- In the sidebar menu, click “API Keys” or in the top menu “Get API key”
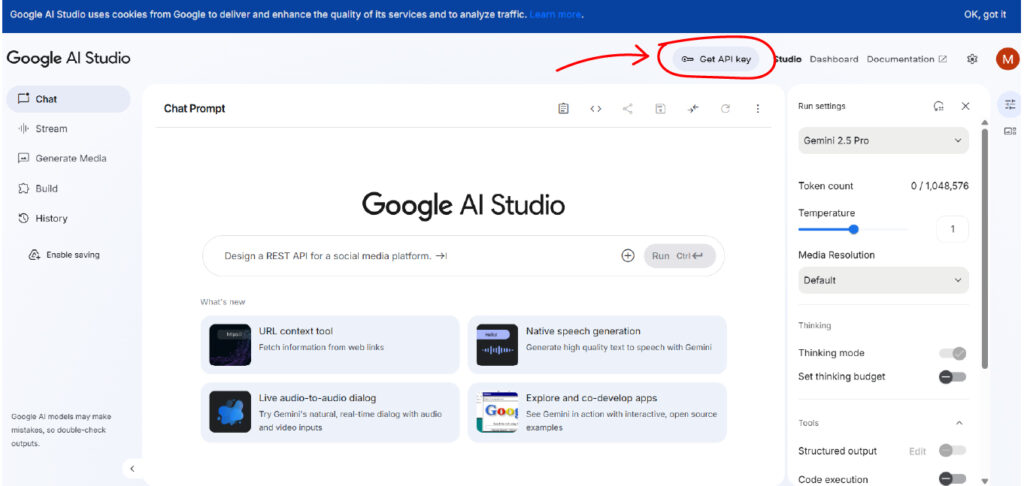
- You will be redirected to the API key management section.
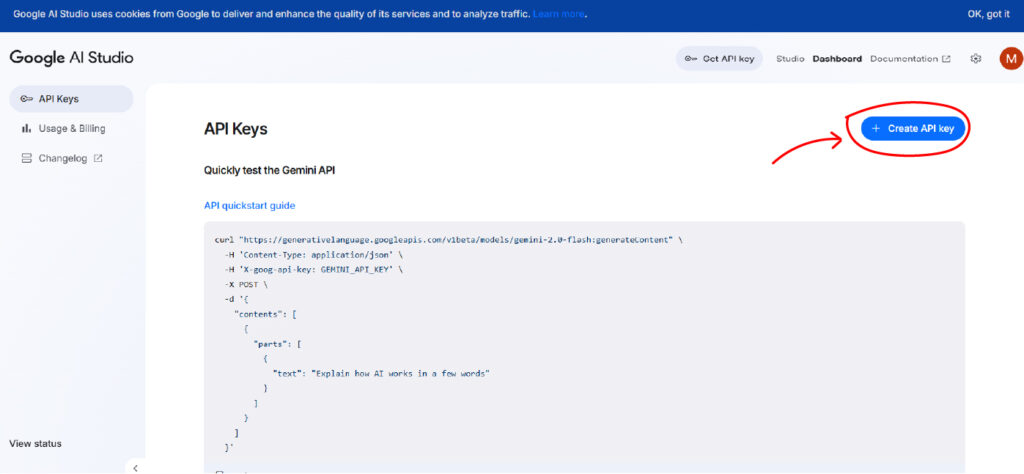
- Click the blue “+ Create API key” button in the top right corner.
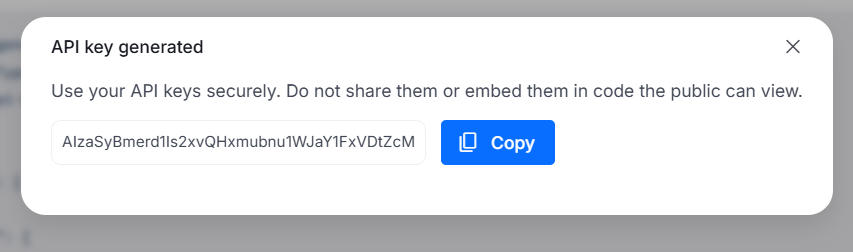
- After creating the key, you will see the “API key generated” window:
- Kliknij przycisk „Copy” aby skopiować klucz
⚠️ WAŻNE OSTRZEŻENIE:- Zapisz klucz w bezpiecznym miejscu
- Nie udostępniaj klucza publicznie
- You can paste this key directly into the PostMaster application. Open Settings->AI and paste the key into the OpenAI API Key field and click Save.
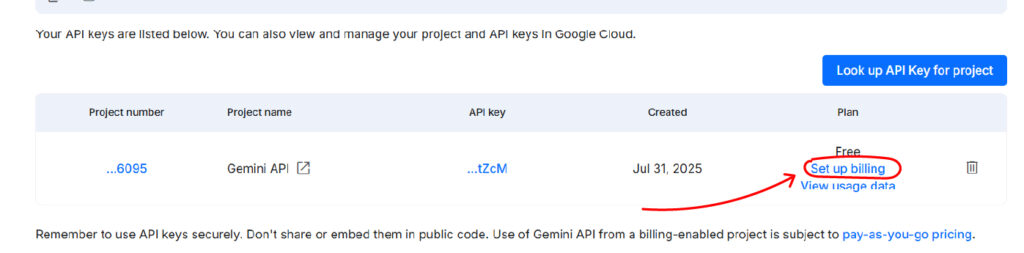
Step 3️⃣: Set up your payment information
- At the bottom of the “API Keys” screen, click the “Set up billing” button in the row with the API key that was just generated.
- The system will redirect you to the Google Cloud Console.
- Dodaj informacje o koncie:
- Użytkownik i Kraj możesz zostawić bez zmian
- Powiadomienia e-mail: – Możesz zaznaczyć opcję otrzymywania aktualizacji o usługach Google Cloud jeśli jesteś tym zainteresowany(a)
- Continue button: “I agree, continue” – By accepting, you agree to:
Google Cloud Platform – Terms of Service
Free Trial – Additional Terms
Other services and APIs used

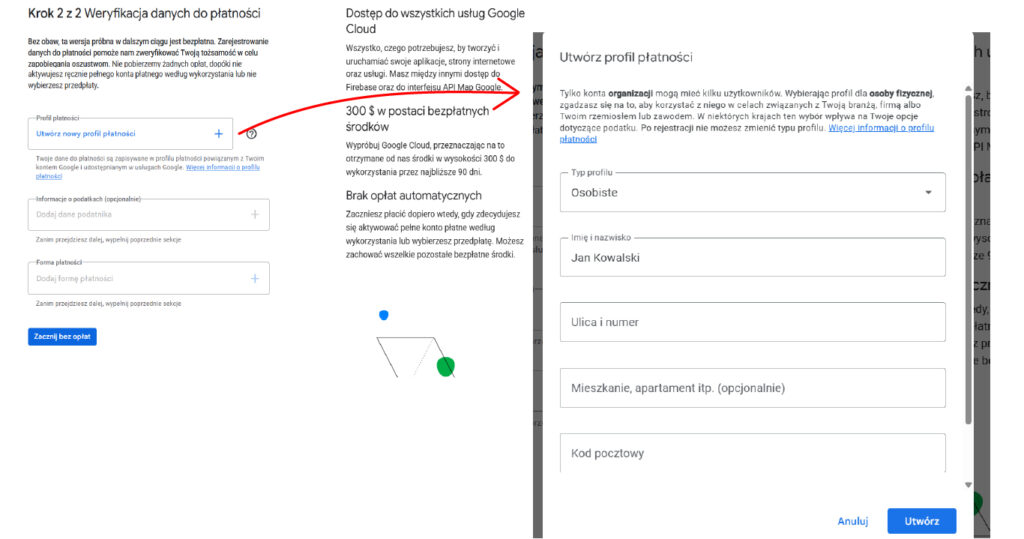
- Kliknij „Utwórz nowy profil płatności”
- Typ profilu: Osobiste
- Wypełnij dane:
- Kod pocztowy: Twój kod pocztowy
- Imię i nazwisko: (np. Jan Kowalski)
- Ulica i numer: Twój adres
- Mieszkanie, apartament itp.: (opcjonalnie)
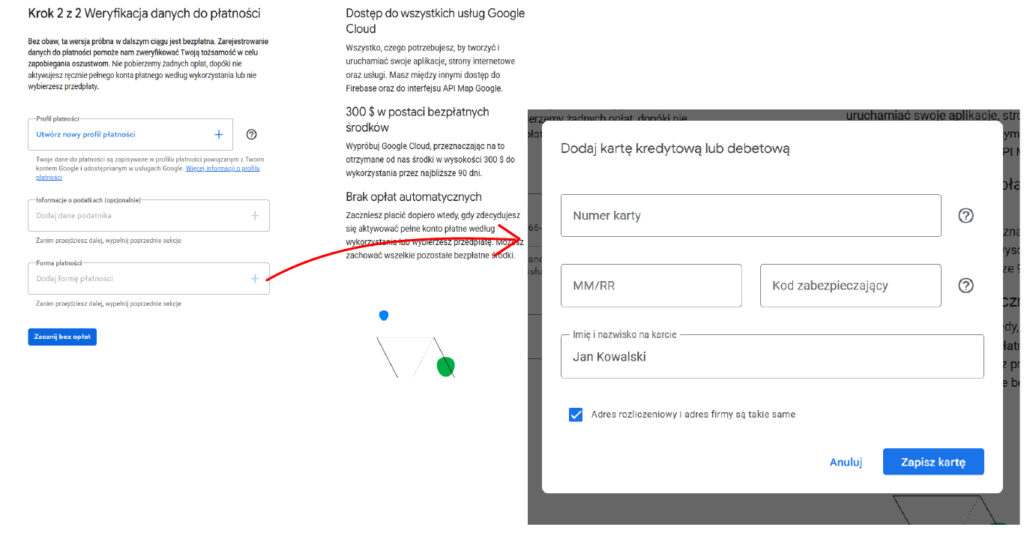
- Kliknij „Dodaj formę płatności” i podaj dane karty
- Numer karty: Wprowadź pełny numer karty
- MM/RR: Data ważności (miesiąc/rok)
- Kod zabezpieczający: CVV/CVC kod z tyłu karty
- Imię i nazwisko na karcie: Dokładnie jak na karcie
- Click the “Save card” button.
- Click the “Start without charges” button.
Creating and publishing posts
AI-powered generation
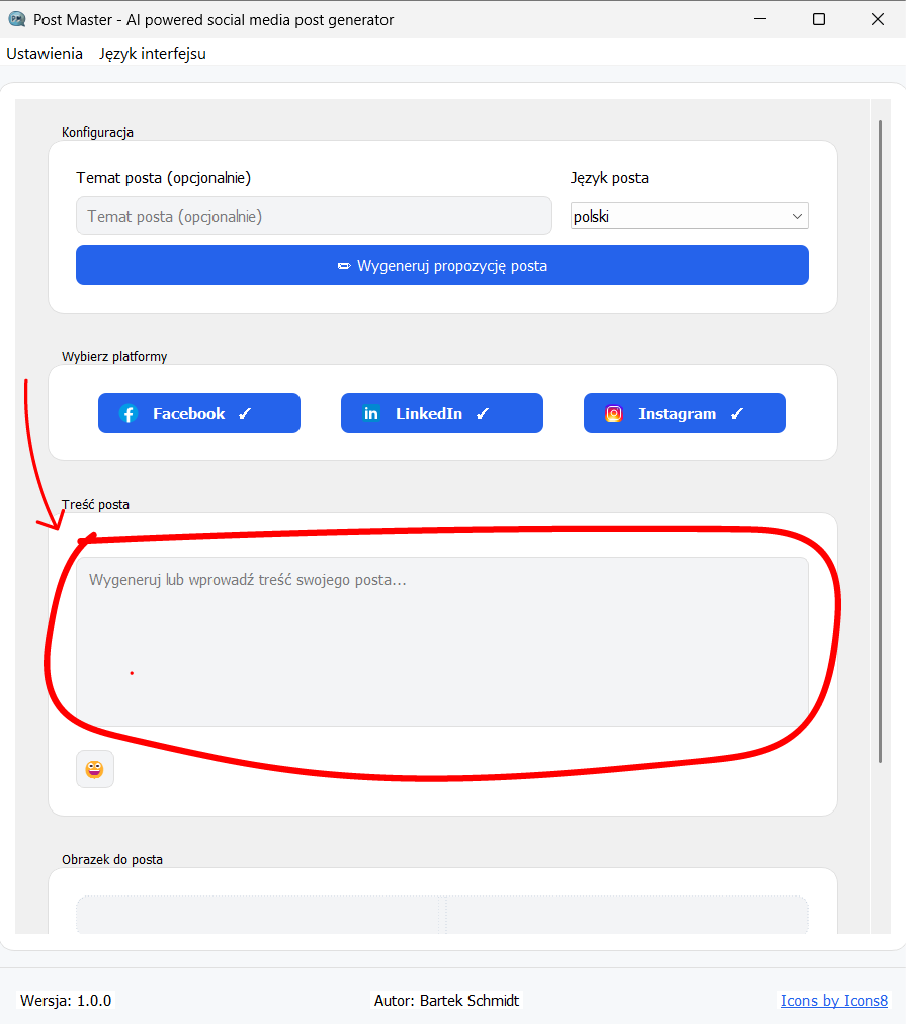
- In the "Post topic (optional)" field, enter what your post should be about.
- In the "Post language" field, select from the list the language in which the text should be generated (e.g., "Polish").
- Kliknij przyciski odpowiadające platformom: Facebook, LinkedIn, Instagram (Zaznaczone przyciski będą miały ikonkę ✔). Dla każdej z wybranych platform zostanie wygenerowana osobna treść posta dostosowana do specyfiki danej platformy.
- Click the "Generate post suggestion" button. AI will prepare initial post content for you based on the provided topic.
- W sekcji „Treść posta” pojawi się tekst wygenerowany przez AI. Możesz:
- zostawić go bez zmian,
- edytować ręcznie,
- dodać emotikony, klikając ikonę emoji.
💡 Wskazówki:
Always read the generated text and make sure it fits your brand.
Im bardziej szczegółowy temat wpiszesz, tym lepiej AI dostosuje treść.
You can generate several suggestions and choose the best one.

Manual creation
In the Post content field, you can manually type the content you want to publish on social media platforms.
You don't need to specify the post topic or language.
If you want the application to automatically recognize on which social media platform the content you created should be published, prepare the post in the following format:
### Facebook Post: (content for Facebook) ### LinkedIn Post: (content for LinkedIn) ### Instagram Post: (content for Instagram)
Publishing posts
- Zanim będziesz mógł opublikować post, musisz połączyć aplikację Post Master z kontami, na które chcesz wysyłać treści.
W górnym menu wybierzUstawieniaa następnie wybierz odpowiednią opcje:- Facebook – aby połączyć z kontem lub stroną Facebooka.
- LinkedIn – aby połączyć z profilem lub stroną firmową LinkedIn.
- Instagram – aby połączyć z kontem Instagram.
Postępuj zgodnie z instrukcjami logowania i autoryzacji dostępu.
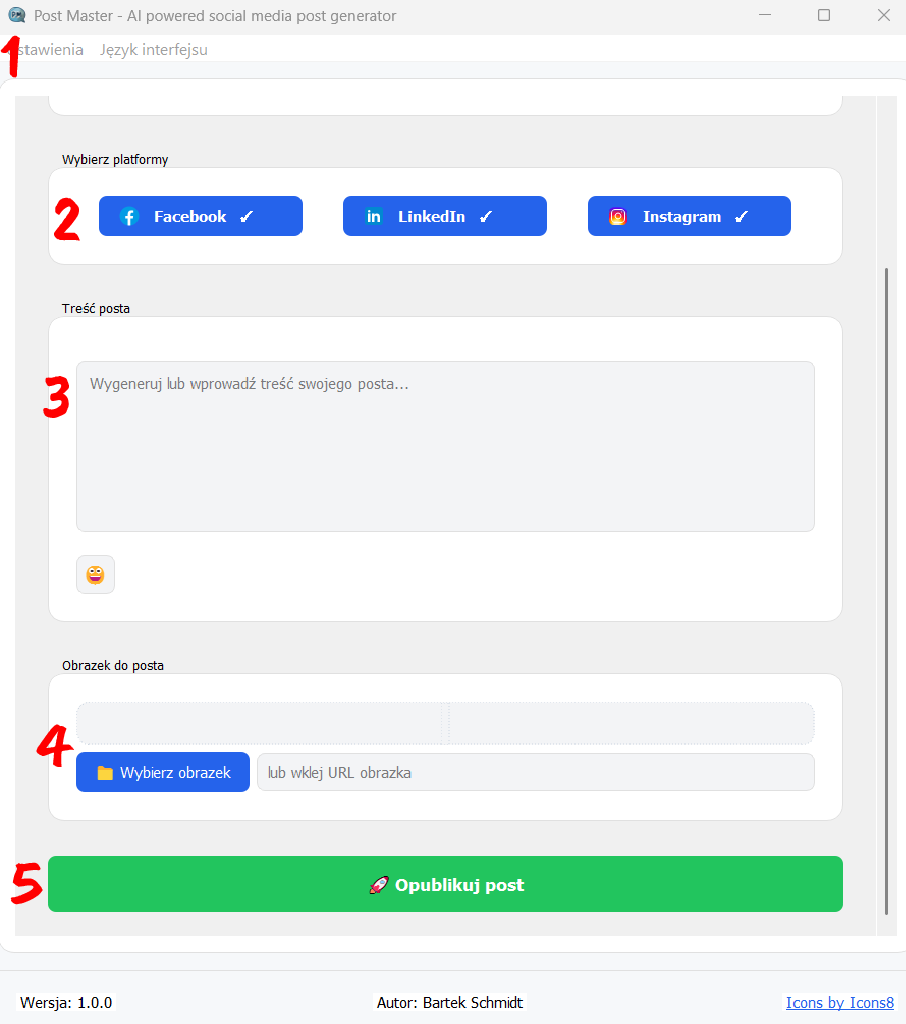
- W sekcji Wybierz platformy. Kliknij przyciski Facebook, LinkedIn, Instagram, aby zaznaczyć, gdzie chcesz opublikować treść.
✔ przy nazwie oznacza, że platforma jest włączona do publikacji.
- Generate or type the post content. If you prepare separate versions in the post content marked in the format:
### Facebook Post:(content for Facebook)### LinkedIn Post:(content for LinkedIn)### Instagram Post:(content for Instagram)
– the application will publish the appropriate content on each platform. If there are no separate markings in the content, the same content will be published on all selected platforms.
- In the Post image section, you can add a file with graphics or a file URL address. When publishing on Instagram, providing a URL address is required.
- Click the publish button. The post will be sent to the selected platforms according to the rules described in point 3.